API Gateway (Eureka + ZUUL) 개발기 #3
앞서 MSA와 Service Discovery를 위한 Eureka Server/Client에 대해 정리했다. 그렇다면 유레카 서버에 등록된 서비스들은 어떻게 접근할까?
물론 유레카 서버 콘솔에 링크된 엔드포인트로 접근이 가능하다. 하지만 이전 포스트에서 말한 Service Discovery 자동화를 위해서는 SERVICE ID만으로 엔드포인트 접근이 가능해야 한다. 그래서 필요한 것이 ZUUL Proxy API GATEWAY이다.
ZUUL이란 무엇?
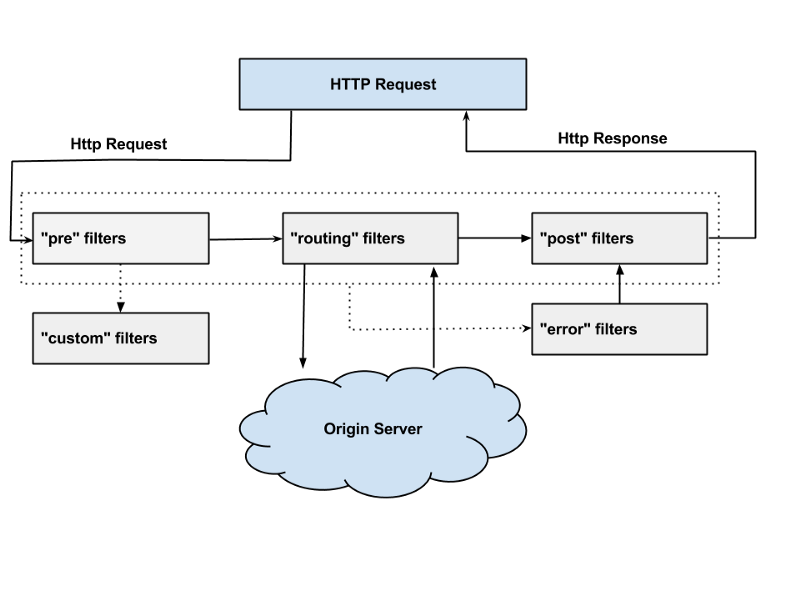
ZUUL은 게이트웨이 서비스 또는 Edge 서비스로서 마이크로서비스 라우팅, 모이터링, 에러처리, 보안 등을 책임진다. ZUUL은 마이크로서비스를 라우팅하는 과정에서 pre filter, route filter, post filter를 거치고 에러 발생 시, error filter를 거친다. 각 필터는 개발자가 자유롭게 커스터마이징 가능하여 로깅, 인증, 모니터링 등 목적에 맞게 개발 할 수 있다.
 |
|---|
| ZUUL의 Request Life Cycle |
| https://medium.com/netflix-techblog/announcing-zuul-edge-service-in-the-cloud-ab3af5be08ee |
ZUUL 시작하기
이번에도 Spring Initializr에서 다음 Dependency를 추가하여 프로젝트를 생성한다.
- Eureka Discovery
- Actuator
- ZUUL
여기서 ZUUL인데 왜 Eureka Client에 필요한 Eureka Discovery가 필요할까?
이전 포스팅의 Eureka(유레카)에 대한 간단한 설명에 언급한 4번을 다시 한번 보자.
4. 유레카 클라이언트는 서버로부터 레지스트리 정보를 읽어와 로컬에 캐시한다.
이후 클라이언트는 로컬에 캐시된 레지스트리 정보를 이용해서 필요한 다른 서비스를 찾을 수 있게된다.
ZUUL은 Eureka Server에 등록된 서비스들의 ID를 통해 접근하기 위해 각 서비스들의 등록 정보를 알아야 한다. 그래서 ZUUL을 Eureka Client로 등록하여 Eureka Server의 등록정보를 로컬에 캐시하고, 그 정보를 바탕으로 service id - service enpoint 매핑이 가능한것.
Spring Initializr로 생성된 ZUUL 프로젝트는 다음과 같은 디렉토리 구조를 갖는다.
SpringCloud-Zuul
    |- src
        |- main
            |- java
                |- com.nelson.kim.SpringCloudZuul
                    |- SpringCloudZuulApplication.java
            |- resource
                |- application.properties
    |- pom.xml
application.properties에 ZUUL 설정 옵션을 입력한다. Spring Boot 2.0 부터는 actuator의 /actuator/routes uri을 사용하기 위해 management.endpoints.web.exposure.include=* 옵션을 사용해야 한다.
server.port=${PORT:9999}
spring.application.name=ZUUL

endpoints.restart.enabled=true
endpoints.shutdown.enabled=true
endpoints.health.sensitive=false

zuul.ignored-services='*'
zuul.ignored-patterns=/**/api/**

management.security.enabled=false
management.endpoints.web.exposure.include=*

eureka.client.serviceUrl.defaultZone=http://localhost:8080/eureka/

############################################################
################### Route Configuration ####################
# Increase the Hystrix timeout to 6.5s (globally)
# Ribbon global settings
ribbon.retryable=true
# Max number of retries on the same server (excluding the first try)
ribbon.MaxAutoRetries=0
# Max number of next servers to retry (excluding the first server)
ribbon.MaxAutoRetriesNextServer=1
# Whether all operations can be retried for this client
ribbon.OkToRetryOnAllOperations=true
# Connect timeout used by Apache HttpClient
ribbon.ConnectTimeout=30000
# Read timeout used by Apache HttpClient
ribbon.ReadTimeout=30000
옵션 설정이 끝나면 메인클래스인 SpringCloudZuulApplication.java에 @EnableZuulProxy, @EnableEurekaClient 어노테이션을 추가한다. 다시 한번 ZUUL을 Eureka Client로 설정하는 이유를 설명하자면, Eureka Server에 등록된 서비스들의 정보를 ZUUL에 캐싱하여 ZUUL을 통해 엔드포인트에 접근하기 위함이다.
@EnableZuulProxy
@EnableEurekaClient
@SpringBootApplication
public class SpringCloudZuulApplication {

	public static void main(String[] args) {
		SpringApplication.run(SpringCloudZuulApplication.class, args);
	}
}
이제 ZUUL을 사용하기 위한 모든 준비는 끝났다. 이전 포스팅에서 만든 Eureka Server, SampleAPI를 실행하고 ZUUL을 실행해 보자.
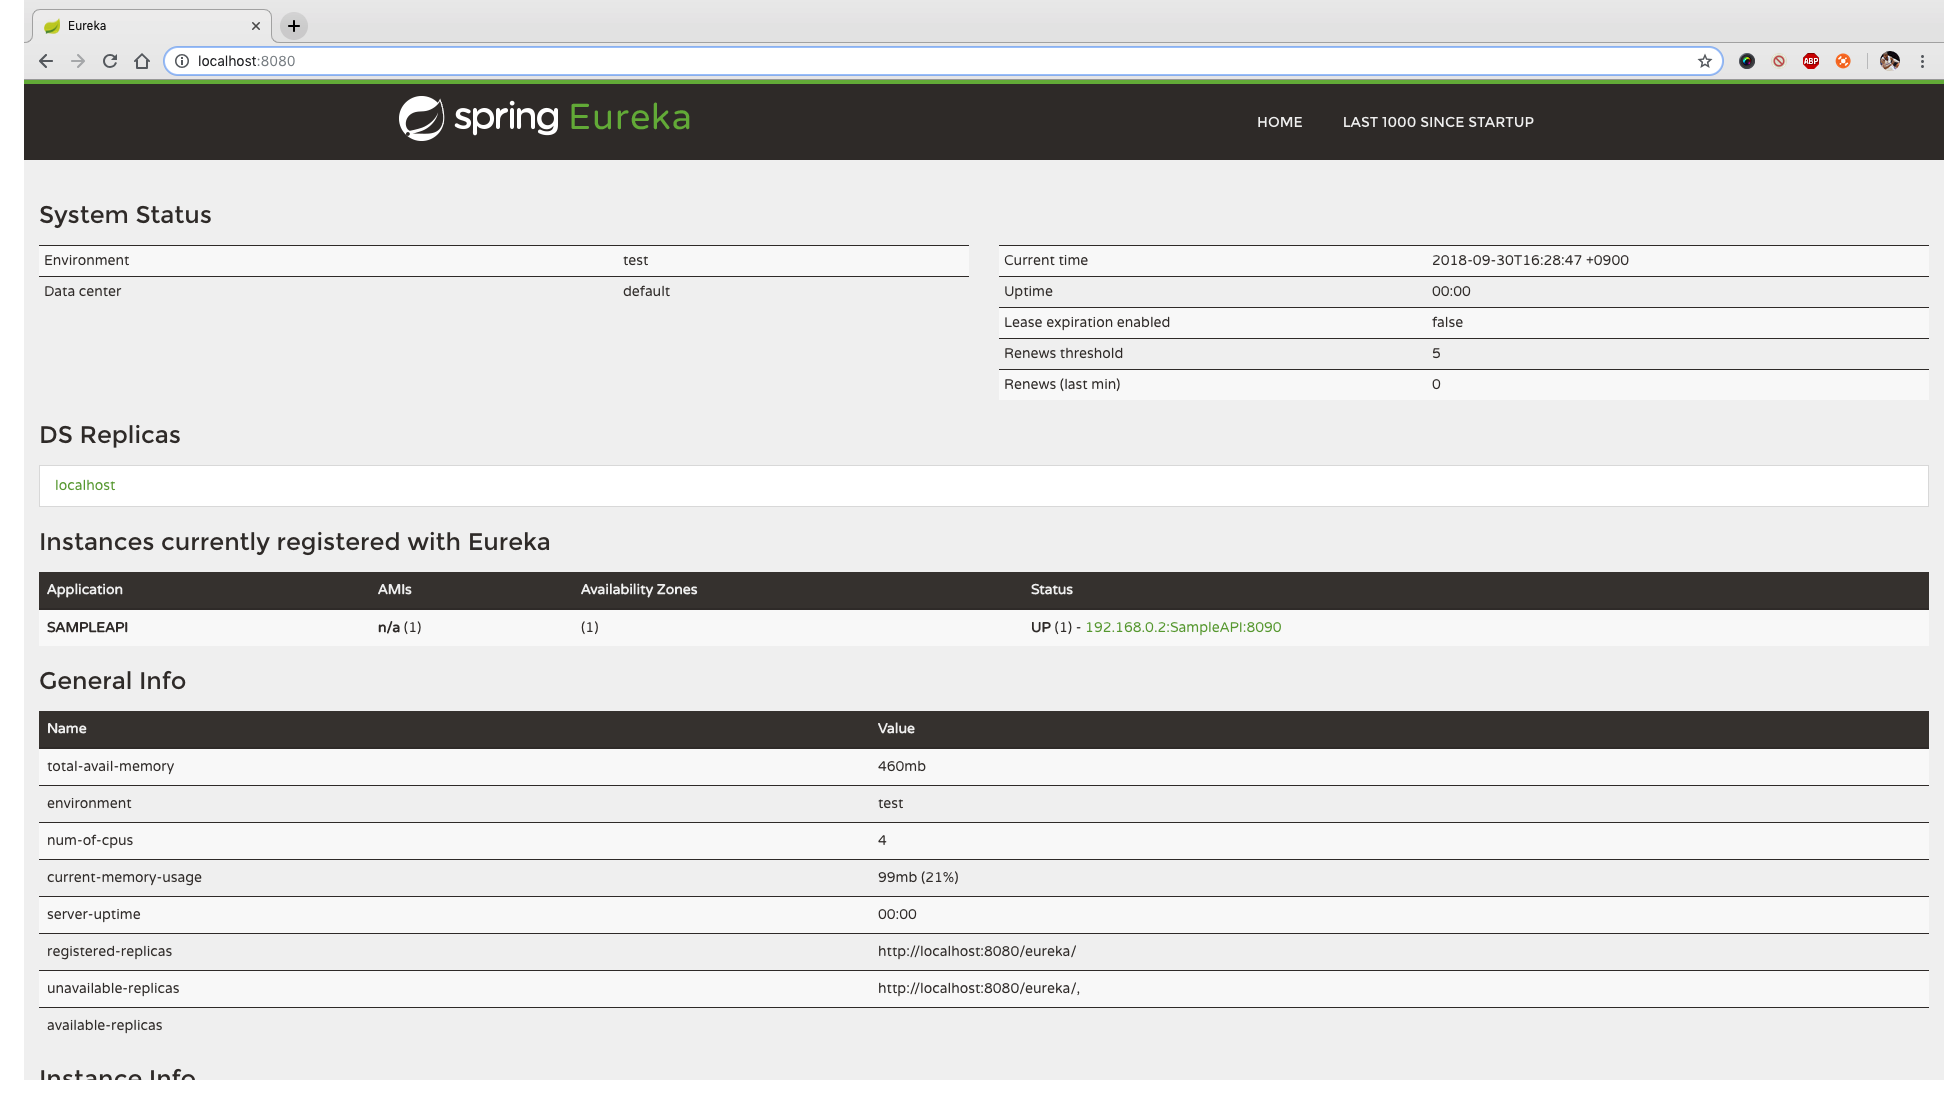
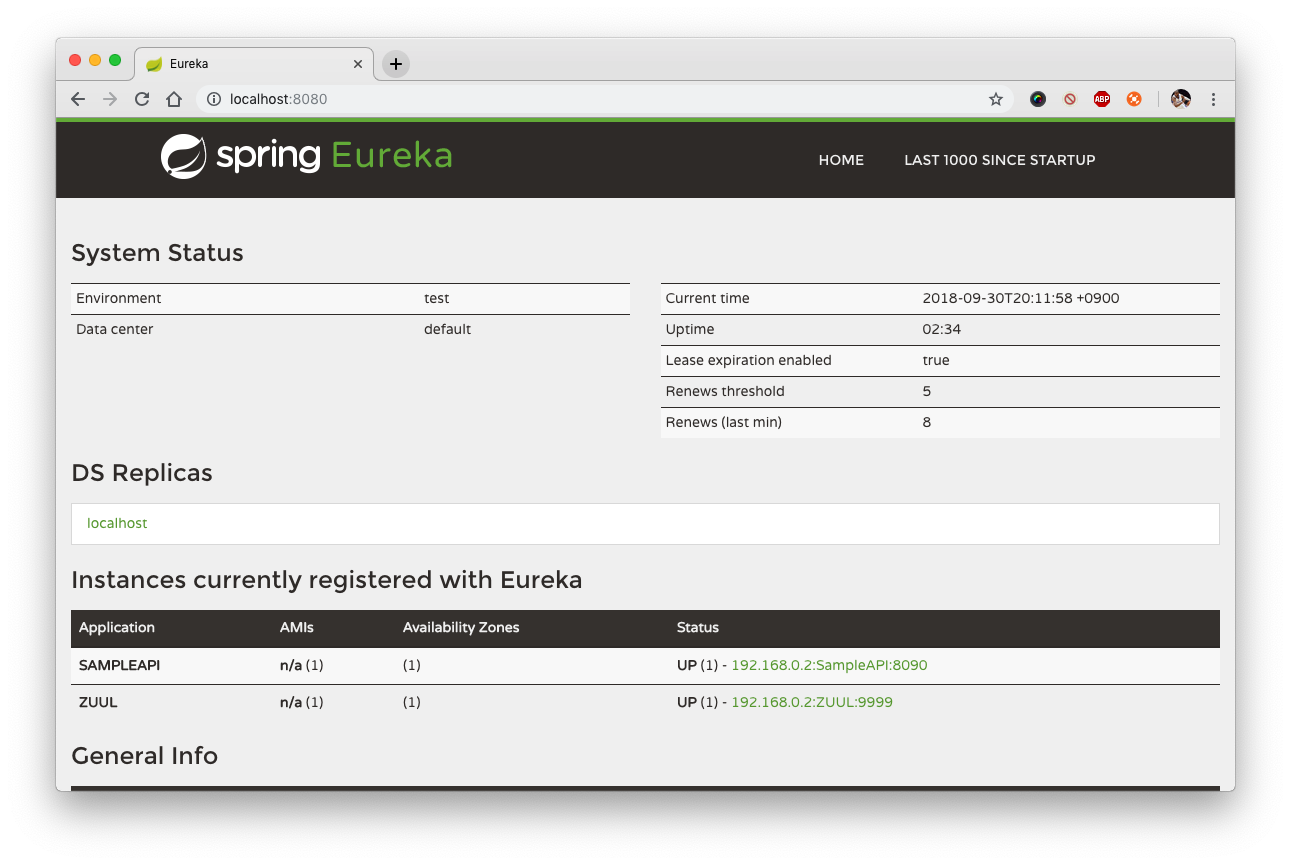
http://localhost:8080에 접속하면Eureka Server 웹 콘솔에서 Sample API와 ZUUL이 Eureka Client로 등록된 것을 확인할 수 있다.
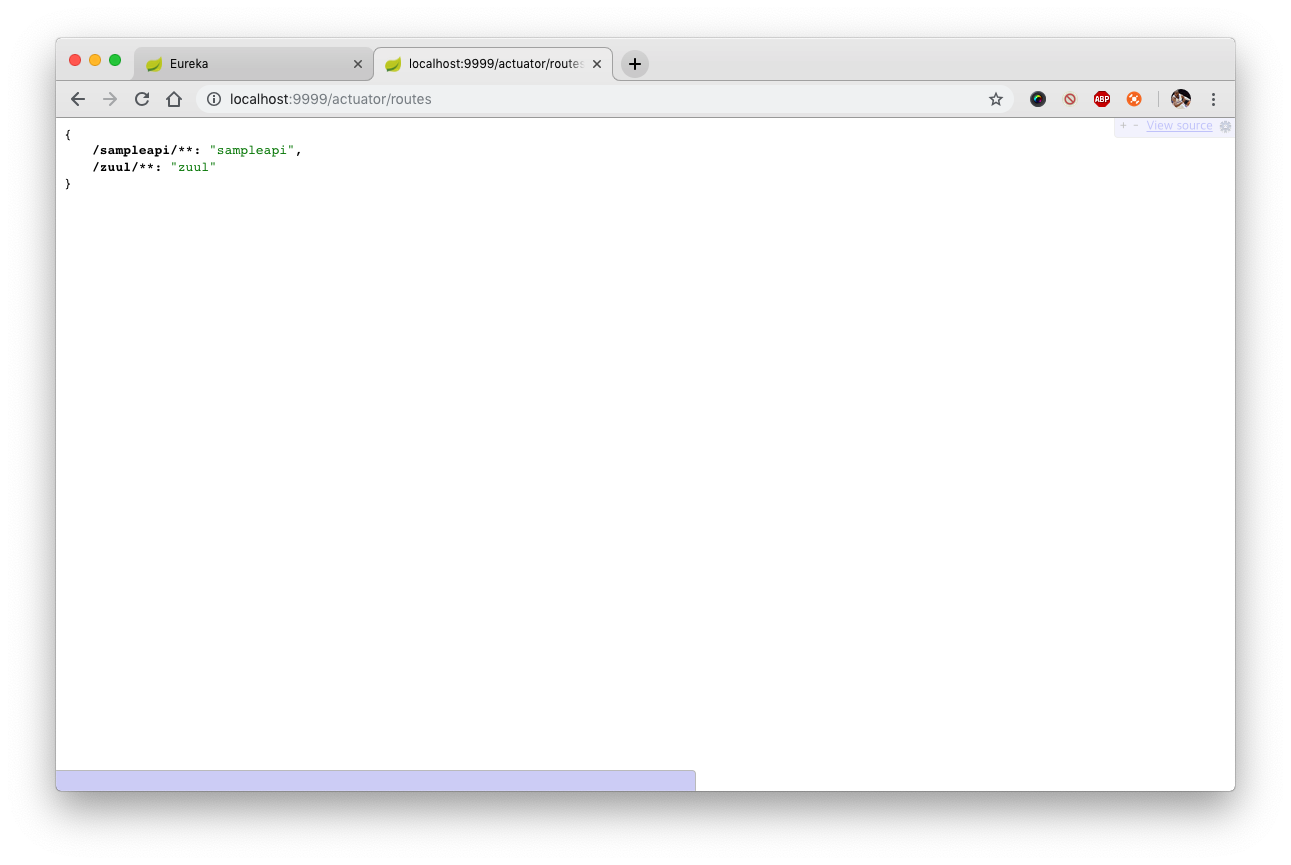
ZUUL에서 /actuator/routes에 접속하면 (http://localhost:9999/actuator/routes) Eureka Server로 부터 캐시한 서비스들을 확인할 수 있다.
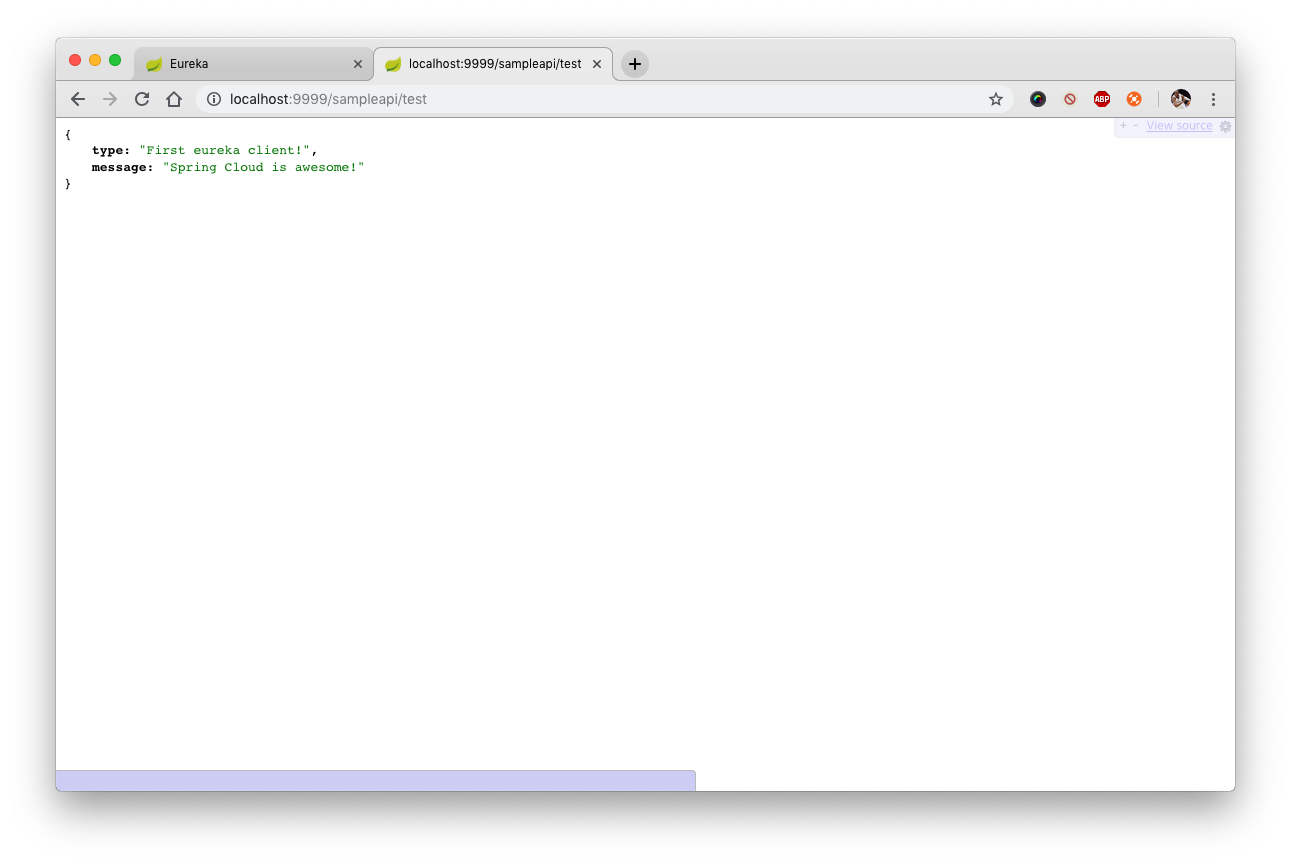
이제 ZUUL을 통해 Service ID로 서비스 접근이 가능하다.Sample API를 ZUUL을 통해 접근해보자. 이전 포스팅에서 Sample API는 /test를 호출하여 간단한 메세지를 반환했다. ZUUL을 통한 Sample API 주소는 http://localhost:9999/sampleapi이고 여기에 /test를 호출하면 된다.
마무리
이번 포스팅에서는 Eureka Server에 등록된 서비스들을 ZUUL을 통해 접근하는 방법에 대해 설명하였다. 개인적으로 Spring Cloud를 시작했을때 ZUUL을 Eureka Client로 등록하는 이유를 이해하지 못해 상당히 어려워했던 기억이 있다. Spring Cloud를 다룬 수많은 포스팅들에 비해 부족하지만, 이 글이 Spring Cloud를 시작하는 분들에게 조금이나마 도움이 됐으면 싶다. 다음 포스팅은 사내에서 사용하기 위해 Container Orchestrator를 크롤링하여 Eureka Server에 서비스를 자동으로 등록하는 Eureka Server에 대해 작성 할 예정이다.
댓글남기기